이번에는 향후 사용하게될 간단한 Project를 생성하고자 합니다. 해당 Project에는 샘플 Database를 사용한 Data Model과 HTML Content의 형식화를 위한 client-side package, 그리고 간단한 요청 Pipeline을 포함할 것입니다.
1. Project 생성
Visual Studio를 실행하여 File -> New -> Project Item을 선택합니다. Project Template중 ASP.NET Core Empty를 선택합니다.

사용할 Project명을 지정합니다.

.NET 6.0을 선택합니다.

최소한의 Project를 생성합니다.
2. Data Model
아래 Sample Database를 내려받아 Microsoft SQL Server Management Studio를 실행하여 Localhost 혹은 원격지 DB에 해당 Database file을 복원합니다.
EF Core Power Tools가 설치되어 있지 않으면 아래 Link를 통해 EF Core Power Tools를 내려 받습니다.
EF Core Power Tools - Visual Studio Marketplace
EF Core Power Tools - Visual Studio Marketplace
Extension for Visual Studio - Useful design-time DbContext features, added to the Visual Studio Solution Explorer context menu. When right-clicking on a C# project, the following context menu functions are available: Reverse Engineer - Generates POCO class
marketplace.visualstudio.com
Project에 Models라는 Folder를 만들고 Project를 Mouse오른쪽 버튼으로 눌러 'EF Core Power Tools'하위에 'Reverse Enginner' Item을 선택합니다.
Choose Database Connection에서 'Add'의 'Add Database Connection'을 선택합니다.
Connection Properties창에서 Server name에 localhost또는 원격 DB의 주소와 port를 입력하고 Authentication에는 해당 DB로 접근가능한 계정을 선택합니다. 인증이 제대로 이루어 졌다면 Select or enter a database name에 위에서 복원한 Northwind를 목록에서 선택하고 'OK'를 눌러줍니다.

그리고 이어지는 Choose Database Connection화면에서 위에서 추가한 Northwind연결항목을 선택한 뒤 'OK'를 눌러줍니다.
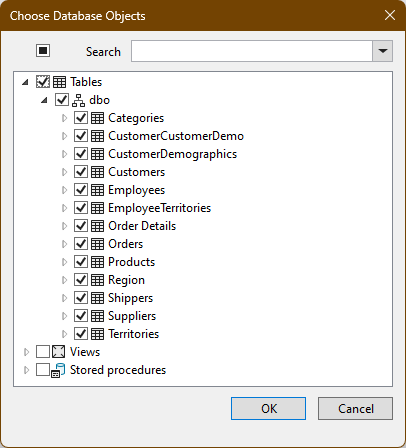
Choose Database Objects에서는 Northwind Database의 모든 Table을 선택합니다.

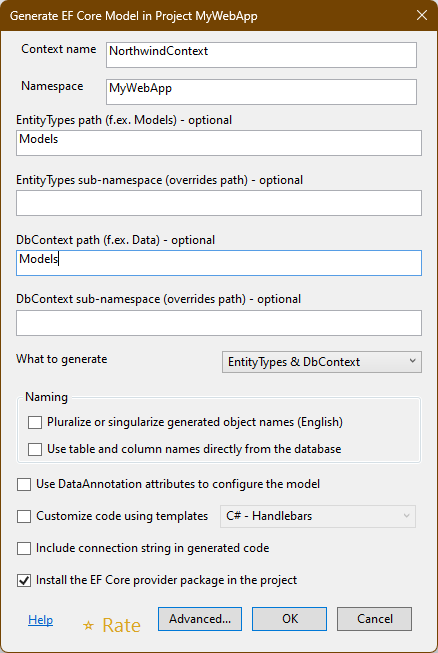
Generate EF Core Model in Project ...에서는 Dbcontext path에 위에서 Project에 추가한 Models라는 folder명을 입력합니다.

잠시 기다리면 Models Folder에 선택한 Table의 Model과 Database Context가 추가될 것입니다. 또한 설치되지 있지 않은 경우 Entity Framework Core Package로 같이 설치될 수 있습니다.
이제 Program.cs에서 아래와 같이 NorthwindContext Service를 추가하고
using MyWebApp.Models;

var builder = WebApplication.CreateBuilder(args);

builder.Services.AddSqlServer<NorthwindContext>(builder.Configuration.GetConnectionString("DefaultConnection"));
DB연결 설정을 appsettings.json file에 추가합니다.
"ConnectionStrings": {
    "DefaultConnection": "Data Source=192.168.1.100;Initial Catalog=Northwind;Persist Security Info=True;User ID=sa;Password=12345;MultipleActiveResultSets=True;TrustServerCertificate=True"
}
3. Bootstrap 설치
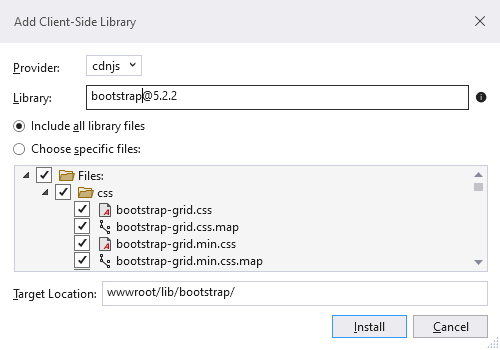
Project에 wwwroot folder를 추가하고 Add -> Client-Side Library를 선택합니다.

Library에 bootstrap@5.2.2를 검색하고 Install을 눌러 설치합니다.
4. 요청 Pipeline 설정
TestMiddleware.cs이름의 Middleware file을 아래와 같이 Project에 정의하고
using MyWebApp.Models;

namespace MyWebApp
{
    public class TestMiddleware
    {
        private RequestDelegate nextDelegate;
        public TestMiddleware(RequestDelegate next)
        {
            nextDelegate = next;
        }
        public async Task Invoke(HttpContext context, NorthwindContext dataContext)
        {
            if (context.Request.Path == "/test")
            {
                await context.Response.WriteAsync($"There are {dataContext.Products.Count()} products\n");
                await context.Response.WriteAsync($"There are {dataContext.Categories.Count()} categories\n");
                await context.Response.WriteAsync($"There are {dataContext.Suppliers.Count()} suppliers\n");
            }
            else
            {
                await nextDelegate(context);
            }
        }
    }
}
해당 Middleware를 요청 Pipeline에 추가합니다.
using MyWebApp.Models;

var builder = WebApplication.CreateBuilder(args);

builder.Services.AddSqlServer<NorthwindContext>(builder.Configuration.GetConnectionString("DefaultConnection"));

var app = builder.Build();

app.UseMiddleware<MyWebApp.TestMiddleware>();

app.MapGet("/", () => "Hello World!");

app.Run();
Project를 실행하고 /test로 URL을 요청하여 다음과 같은 결과가 표시되는지 확인합니다.

'.NET > ASP.NET' 카테고리의 다른 글
| ASP.NET Core - 9. 고급 Web Service 기능 (0) | 2022.12.04 |
|---|---|
| ASP.NET Core - 8. RESTful Web Service (0) | 2022.11.26 |
| ASP.NET Core - 6. Data Caching (0) | 2022.11.13 |
| ASP.NET Core - 5. Platform 기능 활용하기 - 2 (0) | 2022.11.10 |
| ASP.NET Core - 4. Platform 기능 활용하기 - 1 (0) | 2022.11.07 |

