1. Project 생성
Visual Studio를 실행하고 ASP.NET Core Empty Project유형의 Project를 새로 생성합니다.
2. Data 생성
MSSQL Server에 접속해 BlazorTDB라는 이름의 새로운 database를 생성하고 다음과 같이 3개의 Table을 만든 뒤 필요한 Data를 추가해 줍니다. MSSQL Server의 설치 및 설정은 아래 글을 참고하시면 됩니다.
[Server/SQL Server] - [MSSQL] MS SQL Server 다운로드 및 설치/설정
[MSSQL] MS SQL Server 다운로드및 설치/설정
해당 포스팅에서 설명하는 MS SQL Server는 2019 Developer Edtion입니다. 인터넷에서 아래 주소로 이동합니다. SQL Server 다운로드 | Microsoft SQL Server 다운로드 | Microsoft 지금 Microsoft SQL Server 다운로드를 시
lab.cliel.com
CREATE TABLE [dbo].[Category](
	[CategoryId] [int] IDENTITY(1,1) NOT NULL,
	[CategoryName] [varchar](50) NULL,
 CONSTRAINT [PK_Category] PRIMARY KEY CLUSTERED
(
	[CategoryId] ASC
)WITH (PAD_INDEX = OFF, STATISTICS_NORECOMPUTE = OFF, IGNORE_DUP_KEY = OFF, ALLOW_ROW_LOCKS = ON, ALLOW_PAGE_LOCKS = ON, OPTIMIZE_FOR_SEQUENTIAL_KEY = OFF) ON [PRIMARY]
) ON [PRIMARY]
GO

CREATE TABLE [dbo].[Manufacturer](
	[ManufacturerId] [int] IDENTITY(1,1) NOT NULL,
	[ManufacturerName] [varchar](50) NULL,
	[ManufacturerInc] [varchar](50) NULL,
 CONSTRAINT [PK_Manufacturer] PRIMARY KEY CLUSTERED
(
	[ManufacturerId] ASC
)WITH (PAD_INDEX = OFF, STATISTICS_NORECOMPUTE = OFF, IGNORE_DUP_KEY = OFF, ALLOW_ROW_LOCKS = ON, ALLOW_PAGE_LOCKS = ON, OPTIMIZE_FOR_SEQUENTIAL_KEY = OFF) ON [PRIMARY]
) ON [PRIMARY]
GO

CREATE TABLE [dbo].[Product](
	[ProductId] [int] IDENTITY(1,1) NOT NULL,
	[ProductName] [varchar](50) NULL,
	[ProductPrice] [int] NULL,
	[ProductCategoryId] [int] NULL,
	[ProductManufacturerId] [int] NULL,
 CONSTRAINT [PK_Product] PRIMARY KEY CLUSTERED
(
	[ProductId] ASC
)WITH (PAD_INDEX = OFF, STATISTICS_NORECOMPUTE = OFF, IGNORE_DUP_KEY = OFF, ALLOW_ROW_LOCKS = ON, ALLOW_PAGE_LOCKS = ON, OPTIMIZE_FOR_SEQUENTIAL_KEY = OFF) ON [PRIMARY]
) ON [PRIMARY]
GO

ALTER TABLE [dbo].[Product]  WITH CHECK ADD  CONSTRAINT [FK_Product_Category] FOREIGN KEY([ProductCategoryId])
REFERENCES [dbo].[Category] ([CategoryId])
GO

ALTER TABLE [dbo].[Product] CHECK CONSTRAINT [FK_Product_Category]
GO

ALTER TABLE [dbo].[Product]  WITH CHECK ADD  CONSTRAINT [FK_Product_Manufacturer] FOREIGN KEY([ProductManufacturerId])
REFERENCES [dbo].[Manufacturer] ([ManufacturerId])
GO

ALTER TABLE [dbo].[Product] CHECK CONSTRAINT [FK_Product_Manufacturer]
GO
Insert Into [dbo].[Category]
Values('CPU'),('Memory'),('Mainboard'),('HDD');
Insert Into [dbo].[Manufacturer]
Values('SAM ET', 'SAM'),('HY IC', 'HY'),('INT', 'INT'),('CUS','IM');
Insert Into [dbo].[Product]
Values
('i9 CPU', 150000, 1, 3),
('i7 CPU', 110000, 1, 3),
('RYZEN 5', 90000, 1, 4),
('DDR4', 58000, 2, 1),
('DDR5', 62000, 2, 2),
('DDR5', 62000, 2, 2),
('Blue Board', 84000, 3, 3),
('HHY-PP3', 42000, 3, 4),
('SSD 512', 33000, 4, 1),
('SSD 1G', 43000, 4, 4),
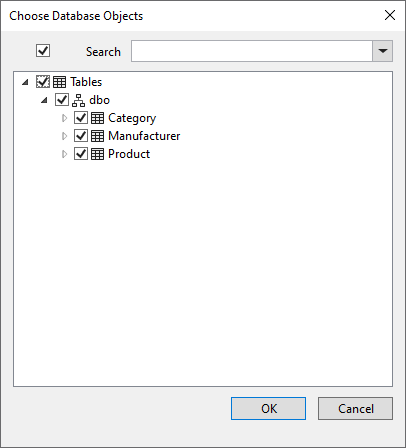
('NVME', 120000, 4, 3);그런 다음 project에 Models folder를 추가하고 EF Core Power Tools를 사용해 위에서 생성한 Table의 Reverse를 수행하여 Models folder에 관련 Model과 Context를 생성합니다.


Model과 Context가 생성되었으면 appsettings.json file에서 다음과 같이 연결문자열과 loglevel을 설정합니다.
{
    "Logging": {
        "LogLevel": {
            "Default": "Information",
            "Microsoft.AspNetCore": "Warning",
            "Microsoft.EntityFrameworkCore": "Information"
        }
    },
    "AllowedHosts": "*",
    "ConnectionStrings": {
        "ProductConnection": "Server=192.168.100.150;Database=BlazorTDB;Trust Server Certificate=true;User ID=sa;Password=1234;MultipleActiveResultSets=True"
    }
}
3. Bootstrap CSS Framework 추가하기
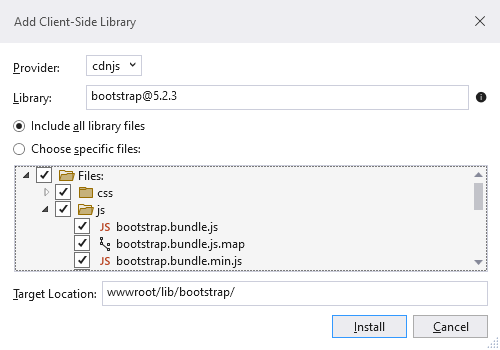
예제 application에서 생성된 HTML 요소의 style을 위해 Bootstrap CSS framework를 사용하고자 합니다. Bootstrap package를 설치하기 위해 project folder에서 Mouse오른쪽 button을 누르고 Add -> Client-Side Library를 선택합니다. 해당 화면에서는 다음과 같이 설정하고

Install button을 눌러 설치를 완료합니다.
4. Service와 Middleware 설정
예제는 요청에 응답하기 위해 MVC Controller와 Razor Page를 모두 사용합니다. 따라서 Program.cs에서 application이 사용할 service와 middleware를 모두 설정해야 하며 appSettings.json에서 설정한 DB연결정보를 가져와 Service로 추가합니다.
using Microsoft.EntityFrameworkCore;
using MyBlazorApp.Models;

var builder = WebApplication.CreateBuilder(args);

builder.Services.AddDbContext<BlazorTDBContext>(opts => {
	opts.UseSqlServer(builder.Configuration["ConnectionStrings:ProductConnection"]);
	opts.EnableSensitiveDataLogging(true);
});

builder.Services.AddControllersWithViews();
builder.Services.AddRazorPages();

var app = builder.Build();

//app.MapGet("/", () => "Hello World!");

app.UseStaticFiles();
app.MapControllers();
app.MapControllerRoute("controllers", "controllers/{controller=Home}/{action=Index}/{id?}");
app.MapRazorPages();

app.Run();
또한 예제에서는 controllers로 시작하는 URL 경로에 대응하는 controller route를 추가하여 controller와 Razor Page사이에 전환을 명확히 구분할 수 있도록 하였습니다. Razor Page로의 요청은 /pages로 시작합니다.
참고로 BlazorTDBContext에 대한 Service추가 시 EnableSensitiveDataLogging method를 사용하는 건 Entity Framework
Core가 database로 전송되는 SQL query를 log 하기 위해서입니다.
5. Controller와 View 만들기
controller를 통해 application의 data를 표현하기 위해 project에 Controllers folder를 생성하고 HomeController.cs file을 아래와 같이 추가합니다.
using Microsoft.AspNetCore.Mvc;
using Microsoft.EntityFrameworkCore;
using MyBlazorApp.Models;
using System;

namespace MyBlazorApp.Controllers
{
    public class HomeController : Controller
    {
        private BlazorTDBContext context;
        public HomeController(BlazorTDBContext dbContext)
        {
            context = dbContext;
        }
        public IActionResult Index([FromQuery] string selectedManufacturer)
        {
            return View(new ProductListViewModel
            {
                Product = context.Product.Include(p => p.ProductCategory).Include(p => p.ProductManufacturer),
                Manufacturer = context.Manufacturer.Select(m => m.ManufacturerName).Distinct(),
                SelectedManufacturer = selectedManufacturer
            });
        }
    }

    public class ProductListViewModel
    {
        public IEnumerable<Product> Product { get; set; } = Enumerable.Empty<Product>();
        public IEnumerable<string> Manufacturer { get; set; } = Enumerable.Empty<string>();
        public string SelectedManufacturer { get; set; } = String.Empty;
        public string GetClass(string? Manufacturer) => SelectedManufacturer == Manufacturer ? "bg-info text-white" : "";
    }
}
또한 controller에 대응하는 view가 필요하므로 project에 Views/Home folder를 생성하고 Index.cshtml이름의 Razor View file을 아래와 같이 추가합니다.
@model ProductListViewModel

@{
}

<h4 class="bg-primary text-white text-center p-2">Product</h4>
<table class="table table-sm table-bordered table-striped">
	<thead>
		<tr>
			<th>ID</th>
			<th>Name (Price)</th>
			<th>Category</th>
			<th>Manufacturer</th>
		</tr>
	</thead>
	<tbody>
		@foreach (Product p in Model?.Product ?? Enumerable.Empty<Product>())
		{
			<tr class="@Model?.GetClass(p.ProductManufacturer?.ManufacturerName)">
				<td>@p.ProductId</td>
				<td>@p.ProductName, @p.ProductPrice?.ToString("#,##0")</td>
				<td>@p.ProductCategory.CategoryName</td>
				<td>@p.ProductManufacturer?.ManufacturerName</td>
			</tr>
		}
	</tbody>
</table>

<form asp-action="Index" method="get">
	<div class="form-group">
		<label for="selectedManufacturer">Manufacturer</label>
		<select name="selectedManufacturer" class="form-control">
			<option disabled selected>Select Manufacturer</option>
			@foreach (string Manufacturer in Model?.Manufacturer ?? Enumerable.Empty<string>())
			{
				<option selected="@(Manufacturer == Model?.SelectedManufacturer)">
					@Manufacturer
				</option>
			}
		</select>
	</div>
	<button class="btn btn-primary mt-2" type="submit">Select</button>
</form>
tag helper를 사용하고 view에서 기본적으로 필요한 namespace를 지정하기 위해 _ViewImports.cshtml이름의 Razor View Import file을 project의 Views folder에 아래와 같이 추가합니다.
@addTagHelper *, Microsoft.AspNetCore.Mvc.TagHelpers
@using MyBlazorApp.Models
@using MyBlazorApp.Controllers
이어서 controller view를 위한 기본 layout을 생성하기 위해 _ViewStart.cshtml이름의 Razor View Start file을 Views folder에 아래와 같이 추가합니다.
@{
	Layout = "_Layout";
}
마지막으로 controller view를 위한 layout을 생성하기 위해 project에 Views/Shared folder를 생성하고 _Layout.cshtml이름의 Razor Layout을 아래와 같이 추가합니다.
<!DOCTYPE html>

<html>
<head>
    <meta name="viewport" content="width=device-width" />
    <title>@ViewBag.Title</title>
    <link href="/lib/bootstrap/css/bootstrap.min.css" rel="stylesheet" />
</head>
<body>
    <div>
        @RenderBody()
    </div>
</body>
</html>
6. Razor Page 만들기
Razor Page를 사용해 application의 data를 표현하기 위해 project에 Pages folder를 생성하고 Index.cshtml 이름의 Razor Page를 아래와 같이 추가합니다.
@page "/pages"
@model MyBlazorApp.Pages.IndexModel

<h4 class="bg-primary text-white text-center p-2">Product</h4>
<table class="table table-sm table-bordered table-striped">
	<thead>
		<tr>
			<th>ID</th>
			<th>Name (Price)</th>
			<th>Category</th>
			<th>Manufacturer</th>
		</tr>
	</thead>
	<tbody>
		@foreach (Product p in Model?.Product ?? Enumerable.Empty<Product>())
		{
			<tr class="@Model?.GetClass(p.ProductManufacturer?.ManufacturerName)">
				<td>@p.ProductId</td>
				<td>@p.ProductName, @p.ProductPrice?.ToString("#,##0")</td>
				<td>@p.ProductCategory.CategoryName</td>
				<td>@p.ProductManufacturer?.ManufacturerName</td>
			</tr>
		}
	</tbody>
</table>

<form asp-action="Index" method="get">
	<div class="form-group">
		<label for="selectedManufacturer">Manufacturer</label>
		<select name="selectedManufacturer" class="form-control">
			<option disabled selected>Select Manufacturer</option>
			@foreach (string Manufacturer in Model?.Manufacturer ?? Enumerable.Empty<string>())
			{
				<option selected="@(Manufacturer == Model?.SelectedManufacturer)">
					@Manufacturer
				</option>
			}
		</select>
	</div>
	<button class="btn btn-primary mt-2" type="submit">Select</button>
</form>
using Microsoft.AspNetCore.Mvc;
using Microsoft.AspNetCore.Mvc.RazorPages;
using Microsoft.EntityFrameworkCore;
using MyBlazorApp.Models;
using System;
namespace MyBlazorApp.Pages
{
public class IndexModel : PageModel
{
private BlazorTDBContext context;
public IndexModel(BlazorTDBContext dbContext)
{
context = dbContext;
}
public IEnumerable<Product> Product { get; set; } = Enumerable.Empty<Product>();
public IEnumerable<string> Manufacturer { get; set; } = Enumerable.Empty<string>();
[FromQuery]
public string SelectedManufacturer { get; set; } = String.Empty;
public void OnGet()
{
Product = context.Product.Include(p => p.ProductCategory).Include(p => p.ProductManufacturer);
Manufacturer = context.Manufacturer.Select(m => m.ManufacturerName).Distinct();
}
public string GetClass(string? Manufacturer) => SelectedManufacturer == Manufacturer ? "bg-info text-white" : "";
}
}Razor Page에서도 마찬가지로 tag helper를 사용하고 Razor Page의 View영역에서 기본적으로 적용할 namespace를 지정하기 위해 Pages folder에 _ViewImports.cshtml 이름의 Razor View import file을 아래와 같이 추가합니다.
@addTagHelper *, Microsoft.AspNetCore.Mvc.TagHelpers
@using MyBlazorApp.Models
@using Microsoft.AspNetCore.Mvc.RazorPages
@using Microsoft.EntityFrameworkCore
Razor Page를 위한 기본 layout을 지정하기 위해 _ViewStart.cshtml 이름의 Razor View start file을 Pages folder에 아래와 같이 추가합니다.
@{
	Layout = "_Layout";
}
계속해서 layout을 생성하기 위해 _Layout.cshtml 이름의 Razor Layout file 역시 Pages folder에 아래와 같이 추가합니다.
<!DOCTYPE html>
<html>
	<head>
		<title>@ViewBag.Title</title>
		<link href="/lib/bootstrap/css/bootstrap.min.css" rel="stylesheet" />
	</head>
	<body>
		<div class="m-2">
			<h5 class="bg-secondary text-white text-center p-2">Razor Page</h5>
			@RenderBody()
		</div>
	</body>
</html>
7. project 실행
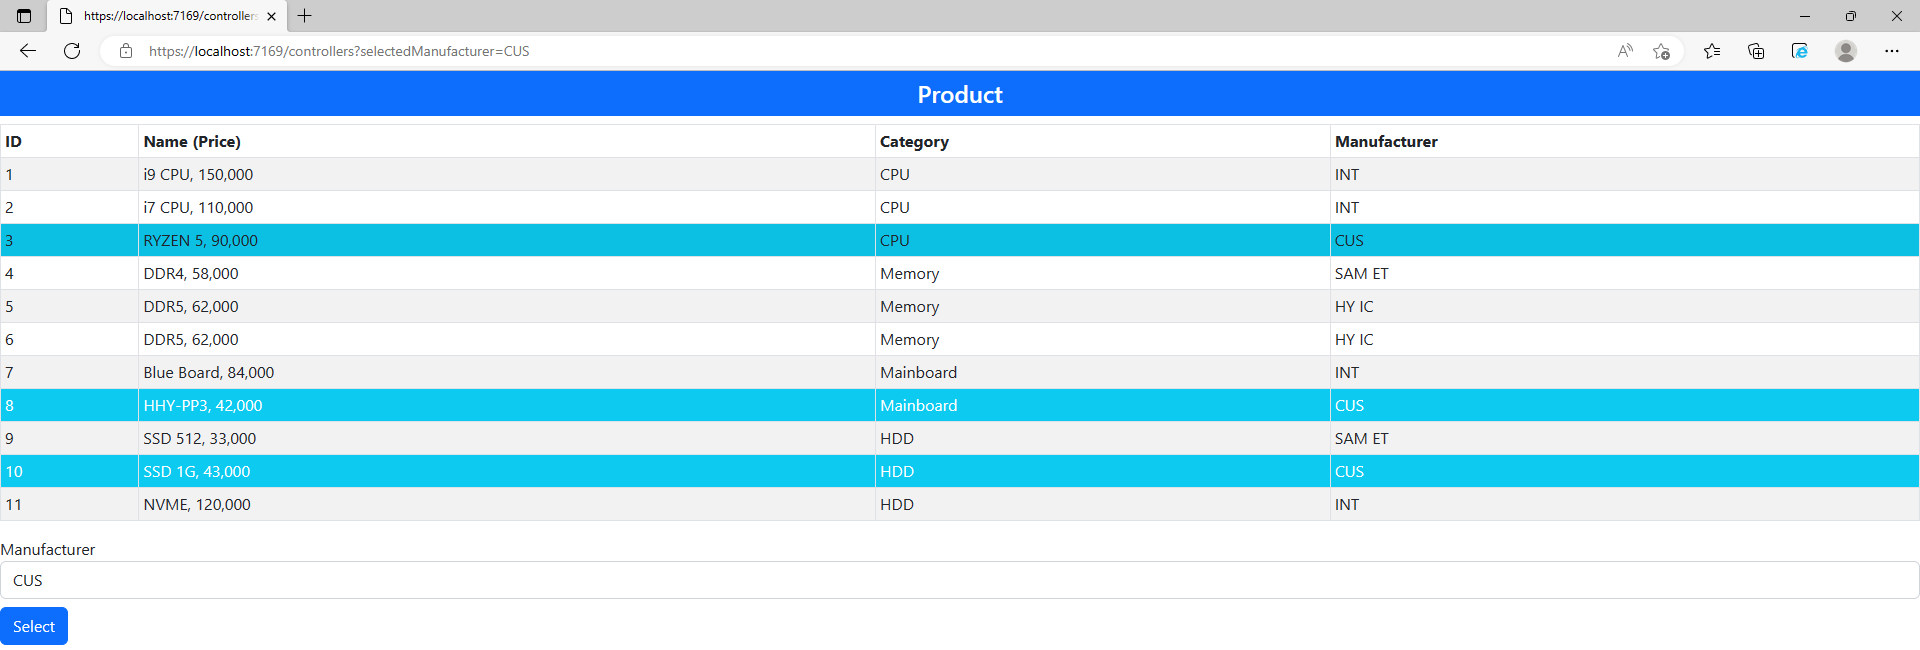
project를 실행하고 /controllers와 /pages에 URL을 요청합니다. 그리고 화면에 있는 select 요소를 통해 Manufacturer를 선택하고 Select button을 눌러 table에서 선택한 Manufacturer의 Row가 강조되어 표현되는지 확인합니다.


'.NET > ASP.NET' 카테고리의 다른 글
| ASP.NET Core - [Blazor] 4. 고급 Blazor 기능 (0) | 2023.03.07 |
|---|---|
| ASP.NET Core - [Blazor] 2. Blazor Server (0) | 2023.03.06 |
| ASP.NET Core - 19. 필터(Filter) (0) | 2023.02.27 |
| ASP.NET Core - 18. Model Validation (0) | 2023.02.18 |
| ASP.NET Core - 17. Model Binding (0) | 2023.02.08 |
![ASP.NET Core - [Blazor] 1. 예제 project 만들기](https://img1.daumcdn.net/thumb/R750x0/?scode=mtistory2&fname=https%3A%2F%2Fblog.kakaocdn.net%2Fdna%2Fw5V4h%2Fbtr0DiyJwFS%2FAAAAAAAAAAAAAAAAAAAAAJH2fCCafLcr5LtK0k9tJoIwSY17qNYQqH0lVBhQg22s%2Fimg.png%3Fcredential%3DyqXZFxpELC7KVnFOS48ylbz2pIh7yKj8%26expires%3D1772290799%26allow_ip%3D%26allow_referer%3D%26signature%3D1XG0Qmgri5RYJiu1iOYoNVMUjrI%253D)